Monday, January 30, 2012

P.S. I Love You

The 1st of February is just a couple days away. That means that Valentine's day is just a little over two weeks away. So in honor of that, I thought I would share a Valentine's Day card with you.


Paper: Basic Black cardstock, Basic Gray cardstock, Whisper White cardstock
Stamps: P.S. I Love You (clear mount and wood mount)
Ink: Basic Gray Stamp Pad, Melon Mambo Stamp Pad, Versamark Pad
Other: pink ribbon (non-Stampin' Up!), Melon Mambo Stampin' Emboss Powder, Heat ToolModern Label Punch


The hearts of hearts are stamped with Versamark ink and embossed with Melon Mambo Stampin' Emboss Powder and a Heat Tool. I love the glossy look the embossing powder makes. The P.S. I Love You stamp set has the neatest Modern Label punch border that i can see myself using again and again. I plan on combining it with the Teeny Tiny Wishes stamp set. The Teeny Tiny Wishes stamp set is a great set for the stamper who is just starting a stamp collection. It covers tons of holidays and events!

I hope you enjoyed today's card and keep stopping back!!

Friday, January 27, 2012

Ribbon organization

Since I have started incorporating ribbon into my scrapbook pages and cards I have had trouble storing and organizing my rolls of ribbon. I'm sure I haven't been the only one with this problem.

First they just stayed in a box or drawer or hanging basket, but they always got tangled together or I couldn't find what I wanted.

Then I put them on a pants hanger, but they would just randomly unroll (small but violent heart attacks were experienced because of a roll all of a sudden coming unrolled with nobody near it.) or one would go empty in the middle of the hanger so most of the rolls would have to be removed to remove/replace the empty roll. To fix the unrolling problem I was experiencing, I used Mini Clothespin Adornments and clipped the end of the ribbon to the spool. It worked pretty effectively, but I still had the problem of rolls going empty in the middle and the mess that caused.

So, I was searching the internet and blogs and pinterest trying to find a solution to my ribbon mess. Then, one day as I was randomly checking my e-mail, I received an e-mail notification that a blog I was subscribed to had posted. So I clicked on the link and low and behold, there was the answer to my problem!!


These handy dandy (can you tell I have a two year old that likes Blue's Clues?) ribbon racks are made by Simply Renee. They can be a little pricy, but they have been on sale on www.scrapbook.com lately. These have certainly been the answer to my ribbon organization prayers. If you want to take a whole roll of ribbon to your table to work with, you just grab it out of the trough and go! From my table I can see what I have in what colors and the clips that hang from the bar on the bottom of the rack hold the ribbon that isn't long enough to be on a roll so fabulously well! You can also see in the picture above that the top ribbon rack isn't completely full, but there is a stopper that you just slide right up against your ribbon to keep it from falling over.


As you can see, I even have duplicate rolls stored in the trough, gotta love the Stampin' Up! Clearance Rack Blitz when they offer ribbon bundles for a very reasonable price! The clips on the bottom are also great for hanging baker's twine packaging to. Just remember when you use your baker's twine not to throw away the plastic wrap that it came with, that will help keep the twine contained and free from tangling. 

Another feature that I love is the little compartment to hold your scissors! I always would get up to get ribbon and forget my scissors or the only pair of scissors I could find would be a little yucky pair that wouldn't cut the ribbon nicely. I have now remedied the problem of yucky scissors by purchasing Stampin' Up!'s Craft and Paper Scissors and Paper Snips and tossing my really bad yucky scissors. 

These two ribbon racks have probably been one of my smartest purchases for organization in my craft room. Of course, I say that after every purchase I make for organizing anything, from my 7.5' tall and 8' wide oak hutch I purchased for $50 to these ribbon racks to the mini milk crates that house my clear mount stamp sets and Spellbinders and Framelits dies in DVD cases. You can take a peek at the mini milk crates I use for organization by checking out Dakota Stamper on Facebook. I'll be sure to post my wonderful oak hutch someday soon. It needs a little tweaking still as I keep moving things around when I realize they just don't work where I have them stored.

Thanks for stopping by today and be sure to keep checking back for more inspirational ideas!

Monday, January 23, 2012

Outlined Occasions

The fabulous Stampin' Up! event, Sale-A-Bration starts tomorrow, January 24th, and runs through March 31st.
As I have told you in previous posts, for every $50 you spend (not including shipping or taxes), you get one free product from the Sale-A-Bration brochure. Most of the items in the brochure are only available during Sale-A-Bration, but there are a few that are freebies from the Ideas Book and Catalog.
Another great thing about Sale-A-Bration is that if you are a Hostess during Sale-A-Bration and have a $150 workshop/party, you get a free tote along with the Hostess benefits! If you have a $400 workshop/party, you get a free hostess bundle of 3 products on pages 6 and 7 of the Sale-A-Bration brochure.

So here is another card done using a Sale-A-Bration stamp set, Outlined Occasions...


Stamps: Outlined Occasions (Sale-A-Bration 2012)
Paper: Whisper White cardstock, Wisteria Wonder cardstock, Elegant Eggplant cardstock, Lucky Limeade Patterned Designer Series Paper
Ink: Wisteria Wonder Stamp Pad, Lucky Limeade Stampin' Write marker
Other: Vintage Wallpaper Embossing Folder, Big Shot, Everyday Enchantment Ribbon and Brad Pack (Lucky Limeade 1/8" Organdy Ribbon), Snail adhesive

Saturday, January 21, 2012

Happy Birthday to me!!

Well, it's the last day of my birthday week! And as promised, here's two cards for you!

The first one...


The first one is pretty simple. The rhinestones in the Distressed Flourish stamp are sort of hard to see in this picture, but they add just the right amount of sparkle.

Stamps: Happy Birthday (Close to my Heart), Distressed Flourish (non-Stampin' Up!)
Paper: Pretty In Pink cardstock, Soft Suede cardstock, Very Vanilla cardstock
Ink: Soft Suede Stamp Pad, Pretty In Pink Stamp Pad

Here's the second card...


I love this bow! It's a faux bow! Here's how you make it.

Get a 9" piece of ribbon and an Antique Brad. I used 1 1/4" Striped Grosgrain Ribbon in Soft Suede.
Spread the legs of the brad far apart. Set the brad aside.
Lay the ribbon on the table and fold the left end in about 3 inches but angle it down a little bit (this will be one of the bow tails). Then fold the right end in about 3 inches and angle it down a little bit (that's the other bow tail).
Then put your finger in the middle of the ribbon where the "tails" cross. Use your middle finger on the top of the "bow" and thumb on the bottom of the "bow" to scrunch the ribbon together. Put the head of the brad where your middle finger is and wrap the legs of the brad around the ribbon. TADA!!! Use a Stampin' Dimensional to adhere it to the card.

Here are the supplies for the card...
Stamps: Happy Birthday (Close to my Heart), Distressed Flourish (non-Stampin' Up!)
Paper: Pretty In Pink cardstock, Soft Suede cardstock, Very Vanilla cardstock
Ink: Soft Suede Stamp Pad, Pretty In Pink Stamp Pad

Thanks for stopping by today! Leave comments and questions if you have any!! 

Friday, January 20, 2012

Curly Cute Happy Birthday

Happy Friday Everyone!!
It is day 5 of my birthday week. Tomorrow is the last day and I know what you're thinking...well that only means 6 days and 6 cards. But I have two for you tomorrow since I didn't start on Sunday because I was on my way back from Fargo and the Miranda Lambert/Chris Young/Jerrod Niemann concert!

So here is today's card.


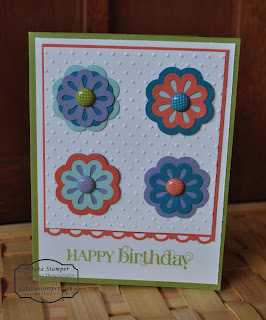
This card features my all time favorite punch! The Blossom Bouquet Triple Layer Punch! It is so cool, it is 3 punches in one. The big flower without petals (the Wisteria Wonder layer of the lower right flower), the small flower without petals and an edge piece (the Island Indigo layer of the top left flower), and the small flower with petals and an edge piece (the Pool Party layer of the bottom left flower).

There's so much you can do with this punch...I know I'll be featuring it in different ways in future posts.

Here's what you need for this card:
Stamps: Curly Cute (clear mount and wood mount)
Paper: Whisper White cardstock, and all of the 2011-2013 In Colors (Calypso Coral, Island Indigo, Lucky Limeade, Pool Party, and Wisteria Wonder
Ink: Lucky Limeade Stamp Pad

I hope you like today's card. If you have any questions or comments, I would love to hear from you. Please post them!

Thursday, January 19, 2012

Elementary Elegance and Everyday Enchantment Happy Birthday Card

It's Thursday and that means day 4 of my birthday week!!
Here's today's card...


Stamps: Elementary Elegance (available during Sale-A-Bration starting January 24th through March 31st)
Paper: Whisper White cardstock, Everyday Enchantment Designer Series Paper (Sale-A-Bration product)
Ink: Lucky Limeade Stamp Pad and Pool Party Stamp Pad (2011-2013 In Colors)
Other: Curly Label Punch, Dotted Scallop Ribbon Border Punch, Paper Snips, Stampin' Dimensionals, Snail adhesive, Everyday Enchantment Ribbon and Brad Pack (Sale-A-Bration product), craft knife, 1/16" hole punch.

Here is a close up of the sentiment...


If you are new to Stampin' Up! then you are probably wondering what Sale-A-Bration is.
Sale-A-Bration is an amazing little sale that goes on from January 24th to March 31st. It even has it's own brochure! For every $50 you spend (not including shipping or taxes), you get one free product from the Sale-A-Bration brochure. Most of the items in the brochure are only available during Sale-A-Bration, but there are a few that are freebies from the Ideas Book and Catalog.
Another great thing about Sale-A-Bration is that if you are a Hostess during Sale-A-Bration and have a $150 workshop/party, you get a free tote along with the Hostess benefits! If you have a $400 workshop/party, you get a free hostess bundle of 3 products on pages 6 and 7 of the Sale-A-Bration brochure. I have featured two of these items in this blog post... The Everyday Enchantment DSP and the Everyday Enchantment Ribbon and Brad Pack. It's a good time to host a workshop/party! If you're interested, give me a shout!

Thanks for stopping by and if you have any questions or comments, feel free to post them!

Wednesday, January 18, 2012

Day 3 of my birthday week!

Day 3! Wednesday!
Here's today's card.


Stamps: Happiest Birthday Wishes - Hostess set (clear mount and wood mount)
Paper: Whisper White cardstock, Pool Party cardstock, So Saffron cardstock, Island Indigo cardstock
Ink: Pool Party Stampin' Write marker, Island Indigo Stampin' Write marker Hint: Color directly on the stamp. If it starts to dry before you get done, just blow hot air (like you're yawning, but exhale instead of inhale) onto the stamp. Be sure to hold the stamp down longer when you do it this way.

I'd love to hear any feedback and happy to answer any questions that you may have! Thanks for stopping by!

Tuesday, January 17, 2012

Perfectly Penned Happy Birthday

Day 2 of my birthday week gives all you readers this beautiful card.


Stamps: Perfectly Penned (clear mount and wood mount)
Paper: Whisper White cardstock, Close To My Heart Animal Crackers paper pack (retired)
Ink: Close To My Heart Dutch Blue

I hope you enjoy day 2! Keep checking back all week!!

Monday, January 16, 2012

It's My Birthday Week!!!

My birthday is on Saturday and I thought I'd "celebrate" all week!! I'm going to post a birthday card I created everyday this week!!
Here's today's...


Stamps: Easy Events (available in  wood mount and clear mount)
Paper: So Safron cardstock (card base), Wild Wasabi cardstock, Wild Wasabi patterned paper, Rose Red cardstock, Whisper White cardstock.
Ink: Basic Black

If you have any questions or comments, please post them! I'd love to hear from you!

Saturday, January 7, 2012

Mixed Bunch butterfly

The new 2012 Occasions Mini Catalog was released on Wednesday, January 4th and like every mini catalog that comes out from Stampin' Up! it is FULL of awesome products!
I made a card with one of my favorite stamp sets from the book, Mixed Bunch, which is found on page 17. It is available in both clear mount and wood mount style. If you are new to stamping with clear mount stamps and are interested, you will need clear mount blocks to use the stamps.


All of the colors I used for this card are 2011-2013 In Colors.

Here's what you need to do to make this card:
The card base is a piece of Whisper White cardstock measuring 8.5" x 5.5" scored and folded in half to make it a 4.25" x 5.5" card. Hint: Scoring cardstock makes folding it easier and crisper. Use the Simply Scored score tool and a bone folder.
Set the card base aside.
Grab a piece of Pool Party cardstock and cut it to 4" x 5.25". Grab a piece of Lucky Limeade striped designer series paper and cut it to 2" x 4". Using Snail adhesive, glue the Lucky Limeade paper to the bottom of the Pool Party cardstock.
Then cut a 15" piece of Whisper White 5/8" Satin Ribbon. Lay it under the Pool Party cardstock and tie a knot in the front so it lays over the edge of the Lucky Limeade paper. Glue the Pool Party cardstock to the front of your card base.
Set the card base aside again.
On a piece of Whisper White cardstock, stamp the ornate flower from the Mixed Bunch stamp set using Island Indigo. Using the Blossom Punch available in the Occasions Mini, punch out the flower. Then use a scissors and cut off two side by side petals by cutting between the petals to the center of the flower to make a butterfly.
Now use the Blossom Punch to punch out a flower from Island Indigo cardstock. Stack the butterfly on top of the Island Indigo flower, lining it up with the petals, and cut the flower the same way you did the butterfly. Use some Snail adhesive to glue the two butterflies together slightly offset so the Island Indigo shows on the bottom of the butterfly. Using Basic Pearls Jewels Accents, and form a body and head of the butterfly using smaller pearls for the body and a bigger pearl for the head. Use Stampin' Dimensionals so adhere the butterfly to the card.

On a piece of Wisteria Wonder cardstock, use the Happy Birthday stamp from the Create A Cupcake stamp set (which is available in both clear mount and wood mount) to stamp the sentiment in Wisteria Wonder. Punch the sentiment out with the Modern Label Punch. Use Stampin' Dimensionals to adhere it to the card.

For the sentiment on the inside of the card, use an inside sentiment of your choice from the Create A Cupcake stamp set and stamp it in Wisteria Wonder.
Tada!! A beautiful card using a new stamp set from the 2012 Occasions Mini Catalog and the 2011-2013 In Colors.
Thanks for stopping by and if you have any questions or comments, please post them!!