Saturday, December 31, 2011

Handmade Family Christmas Gifts

My mom and I like to give handmade gifts to our family members at Christmas. She usually gives a beaded bookmark or a crocheted scarf or dish cloth. This year I knew I wanted to do something with my Stampin' Up! tools!


These are Easel Calendars. They use the promotional calendars that you stick to the dashboard of your car. which can be purchased online without the plastic adhesive part. They are rather inexpensive.

Here's a close up of a couple.

To make these you just take a 4" by 12" piece of cardstock and score it using Stampin' Up! Simply Scored tool at 4", 6", and 8". 
Fold the cardstock on the score line at 6" so that the right sides (the side you want showing when finished) are together. Then fold on the score lines at 4" and 8" the other way.
If you want to add a ribbon to the top of the easel, slip the ribbon under the cardstock strip just before the score line at 4" and tie it in the front of the easel card. Then you can glue the front of the easel to the cardstock between the score line at 4" and 6".
You can also punch shapes out using a paper punch like I did with the flowers on top of the bright green glittered calendar. For the flowers I used the Blossom Bouquet Triple Layer punch from Stampin' Up! along with some of their glitter brads.
Design your easel card front however you want (the options are endless) and glue the calendar to the front.
To make it into an easel, place a button on a Stampin' Up! Dimensional or a brad on the cardstock about 2.5" from the score line at 8" or 1.5" from the edge of the cardstock. This is what you use to hold up the front of the easel card. 
Pretty simple!!
I hope you enjoyed this little tutorial and if you have any questions, be sure to leave a comment with your question!
Happy New Year!!
Darla Cameron

Thursday, December 29, 2011

Stampin' Up! Demonstrator!!

Well, after long consideration, I finally did it. I have joined Stampin' Up! as a demonstrator!

I've been a fan of Stampin' Up! since I was in Middle School. My mom purchased some Stampin' Up! stamps when I was a 6th or 7th grader along with a Kaleidoscope ink pad that had the shades of the rainbow and could be pulled apart so they could be inked separately or pushed together to be inked in a rainbow scheme. They were the greatest and my absolute favorite thing to play with.

They used to be made out of black foam for the blocks.

Then came along wood-mount stamps, which are still popular and available for sale in most stamp sets.

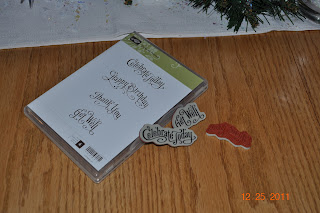
The latest in stamps from Stampin' Up! is the clear-mount stamps which "cling" to an acrylic block and are stored in a DVD case. 

The clear-mount stamps are my favorite because they take up so little space, but there's still something about holding that wood block in your hand when stamping. Kinda like how I love my Barnes and Noble nook, but still like to actually turn a page in a real book once in a while.

My resolution for the New Year is to post at least 2 or 3 times a week. Please let me know if there is anything you would like to see on my blog and I will do my best to provide for you.

Thanks for stopping in today. I hope you all have a Happy New Year!!


Monday, December 5, 2011

Come To Bethlehem

We received our second snow of the year yesterday, but there isn't a lot of snow out there. The first snow we received melted before we got the second snow. I like that type of weather!! I know...I know...you're wondering why I live here if I don't like snow. It's not that I don't like snow, I just don't like a lot of it.


Today I made a Christmas card using the Come To Bethlehem stamp set from Stampin' Up!


The card base is Soft Suede and the sentiments and images are stamped on Marina Mist. The ribbon is also Marina Mist.

I used holographic embossing powder to make the star sparkle and shine.

The edges of the cardstock that the Nativity scene is stamped on were inked using a sponge dauber and Cocoa ink from Close to My Heart.

Thanks for stopping by today!

Sunday, November 20, 2011

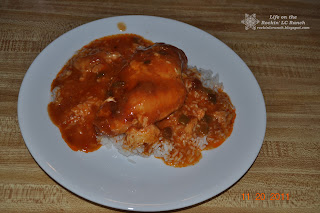
Crockpot Picante Chicken

I tried a new Crockpot recipe today.

I didn't write down the name of the recipe, so I'm naming it Crockpot Picante Chicken.

Place 3 chicken breasts in the Crockpot.


1 Cup Pace Picante and 1 can Cheddar Cheese soup.


Put 1 Cup of Pace Picante sauce in a bowl.


Add 1 can of Cheddar Cheese soup.


Pour mixture over the chicken.


Cook on Low for 5 to 6 hours.

Serve over rice.


My husband doesn't like chicken, but said that this was a good recipe because it adds some zing to the chicken.

Thanks for stopping by today and be sure to keep checking back to see what's going on in Life on the Rockin' LC Ranch.


Friday, November 11, 2011

Happy Thanksgiving card

Thanksgiving is less than 2 weeks away and I'm very excited. Thanksgiving is probably my favorite holiday. What an awesome day it is! A day to be thankful for what we have in our lives. It's a day that people aren't expecting you to give them gifts like Christmas or Valentine's Day. It's just a day to be happy and content with what we have in our lives and appreciate it. All that and well...all the food helps make it my favorite holiday!

In honor of my favorite holiday being just around the corner, I thought I would post a Thanksgiving card.
Now I'm sure you're thinking, a Thanksgiving card?! Who sends those?! But I will be sending a few this year. Especially one to my Grandpa who is in an assisted living home and loves receiving mail. I try to send him a card every month with a picture of Cooper in it. I know that I enjoy getting mail other than bills so why not send a card for Thanksgiving??


I used Die Cuts With a View's Harvest Gathering cardstock stack for the background of the card. The leaves and the sentiment box and frame were cut out using my Cricut Expression and the Art Philosophy cartridge sold exclusively through Close To My Heart. The sentiment was a stamp I purchased from Hobby Lobby. The leaves are stamps that come with the Art Philosophy cartridge from Close To My Heart. The brown stripe in the middle of the card is a piece of 5/8" grosgrain ribbon from Stampin' Up! that has sadly been discontinued. However, it is still available in 1/4" size.

I love the sparkle on the cardstock from DCWV and how it adds a bit of bling and texture to the card.

Thanks for stopping by today and be sure to keep checking back to see what's going on in Life on the Rockin' LC Ranch.

Apology to my followers.

I'm sorry to my followers for the two posts of an odd picture but no explanation. I'm updating my blog background and it required me to post it first. Just a heads up that this is probably going to be happening in the future as I change my backgrounds.
Thanks for following!!

Tuesday, November 8, 2011

Praying For You...

I was setting up a trial run of my craft show table this morning and there was one card that just kept jumping out at me. It was like it was saying, POST ME!! POST ME!!! So here it is.


The base of the card is Elegant Eggplant cardstock by Stampin' Up! The patterned paper strip is So Safron patterned paper by Stampin' Up! I used white cardstock for the flowers and the piece the sentiment is stamped on. The flowers are stamped from the Hooray Bouquet stamp set from Close To My Heart and cut out using the Art Philosophy Cricut cartridge that is exclusively through Close To My Heart. I added a pearl center to the flowers and popped some of them off the cards using pop dots. The sentiment is stamped from the Thoughts and Prayers stamp set from Stampin' Up! It is stamped on a piece of white cardstock that was cut out and embossed using a Spellbinders Nestabilities Labels Twelve die.

I love to use the Art Philosophy Cricut cartridge because it coordinates with so many CTMH stamp sets and has many fun labels and shapes to cut out including take out boxes and pillow boxes.

Remember that you can purchase Stampin' Up! products at http://dakotastamper.stampinup.net

Thanks for stopping by today and be sure to keep checking back to see what's going on in
Life on the Rockin' LC Ranch 

Monday, November 7, 2011

Grandpa Erick's 95th Birthday Party

We had a great time yesterday at Grandpa Erick's 95th Birthday Party.


We had a pretty good turn out and most of the Grandkids and Great-Grandkids were there.


And we even got the guys to take a picture of our family with Grandpa Erick.


So for Grandpa Erick I had to make a birthday card and it couldn't just be one out of my stash. I had to make one specifically for him and this is what I came up with.


I used Stampin' Up!'s Old Olive cardstock for the card base. A piece of Not Quite Navy striped paper for the background. A piece of white cardstock stamped with the Dot, Dot, Dot stamp in Close To My Heart's Olive and Happy Birthday from the Perfectly Penned stamp set in Close To My Heart's Outdoor Denim is my focal point for the card. I finished the card off with a piece of Stampin' Up!'s Old Olive 1/2" Scallop Dots Ribbon. Very simple card, but definitely one I'll be recreating in different color schemes!!  

Thanks for stopping by today and be sure to keep checking back to see what's going on in
Life on the Rockin' LC Ranch.


Sunday, November 6, 2011

You Warm My Heart

Today I wanted to share with you a fun card I made for a craft show I have coming up on the 19th.


This card is an A2 card (4 1/4 by 5 1/2). I used the Close To My Heart stamp set, A Sip stamped on white cardstock and Chocolate card stock that are cut out using Spellbinders Nestabilities 'Labels 18' Dies. The paper that I used for the background is Wonderland by Close To My Heart.

Inside of this card, I stapled an envelope of Swiss Miss cocoa.

This card was fun to make and would make a great stocking stuffer or a nice add on to a teacher gift.

Thanks for stopping by today and be sure to keep checking back to see what's going on in 
Life on the Rockin' LC Ranch.

Saturday, November 5, 2011

The Hubby's favorite bar...

Tonight is the year end awards banquet for the Mouse River Ranch Rodeos series that I've been the Secretary/Treasurer of for the last 2 years. My "term" as the Secretary/Treasurer will come to an end tonight. I decided at the beginning of the Summer that I wanted to spend next Summer making memories with our son, Cooper. Cooper will be 2 on the 18th and I don't want to miss out on anymore memories with him at the ranch rodeos.
So tonight for the awards banquet, I made a pan of Revel Bars. When I told my husband this morning that I was going to make them for tonight he said, "Oh they are my favorite!" So I'm sure he's hoping that there will be some left when we come home.


Here is a picture of the pan of Revel Bars.

These are kind of a comfort food from my childhood. I always remember my mom baking them. 

Here's the recipe:

Revel Bars
crust:
1 C. margarine
2 C. brown sugar
2 eggs
2 tsp. vanilla
2 1/2 C. flour
1 tsp. soda
1 tsp. salt
3 C. oatmeal

filling:
12 oz. chocolate chips
2 tbsp. margarine
2 tsp. vanilla
1 can sweetened condensed milk
1 C. chopped nuts (optional)

Cream together margarine and sugar. Mix in eggs and vanilla. Sift together flour, salt and soda. Stir in oatmeal and dry ingredients to creamed mixture. 
Filling: Microwave chips, margarine and sweetened condensed milk until smooth (about 1-2 minutes); add nuts and vanilla. 
Spread 2/3 of the crust in a jelly-roll pan. Cover with filling. Dot with remaining crust. 
Bake at 350° for 22 to 25 minutes.


I usually don't add the nuts to my bars. I like the filling to be creamy.
I hope you try my recipe and enjoy it just as much as we do!!